A while ago, two unrelated things happened: I got one of those cheap RGB LED strips from Ebay, and I became interested in hardware hacking. If you aren’t familiar with the LED strips, they’re basically a long string of LEDs connected to a controller that usually supports an infrared remote control, which can be used to set the color and intensity of the lights.
When I started tinkering with hardware, I noticed a change: I started looking at common, everyday things around the house and thinking “I bet I could put a controller in that and write an API for it”. This led to a button that orders food when pressed, a rotary mobile phone, a wifi-enabled room fragrance sprayer (I haven’t written that one up, it was too simple), a self-driving RC car (writeup coming up), etc. This is partly because, when you’ve bought and used a few components, you start being able to recognize roughly what the parts of a PCB are, rather than thinking about the PCB as “that weird green plate with all the odd-looking bumps that’s inside my devices”.
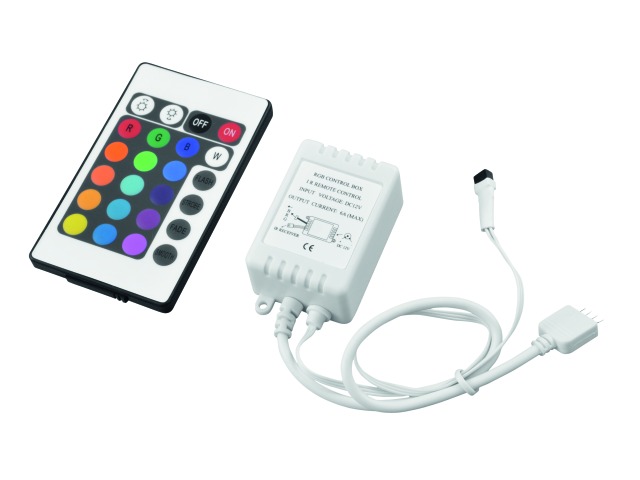 The infrared LED controller.
Ever the shrewd observer, I quickly deduced that the little white box with the RF-receiver-looking-bit must be the controller for the strip, and resolved to open it and see the mysteries it might hold. Oh, how I dreamt of complicated arrays of component upon component, whose purpose I would quickly unravel with my trusty multimeter and zest for the engineered. However, when I finally did unravel the knot of how the complicated assembly held together and managed to open it up by pressing both sides at once, I was faced with a microcontroller chip and three MOSFETs, a kind of tiny electronic switch.
Puzzled that such complicated functionality as changing the color of a LED strip could be implemented by just three MOSFETs, I set out to figure out how the controller worked and how I could replicate that functionality in my designs.
The controller circuit
The circuit turned out to be pretty simple. A microcontroller just pulses the MOSFETs open and closed many thousands of times a second, and that controls the intensity of the different color LEDs in the strip. Each LED assembly actually consists of three smaller LEDs, one red, one green, and one blue. By alternating the intensity of each, you can make any color you want!
Sounds like a simple circuit, doesn’t it? Well, that’s because it is. However, by far the hardest part was finding a MOSFET type that was suitable for driving that much current. It turns out that you need a MOSFET that can:
- Turn on and off at the low voltage (3.3V) and current (no idea) that an ESP8266, my microcontroller of choice nowadays because of its embedded WiFi and general awesomeness, provides.
- Switch 12V, which is what my LED strip uses, and do it fast enough that the LEDs don’t flicker.
- Handle the large amount of current that a long strip needs, without overheating, blowing up, or destroying the earth.
With the help of Martin Ayotte and the rest of the very helpful people in the ESP8266 Arduino Gitter channel, and after multiple false starts and months spent waiting for my orders to arrive from China, only to realize they were unsuitable for the project and start the cycle all over again, I finally found a type of MOSFET that would work: The AO3402 N-MOS, a nifty little component.
After that, the schematic was easy enough to draw and prototype:
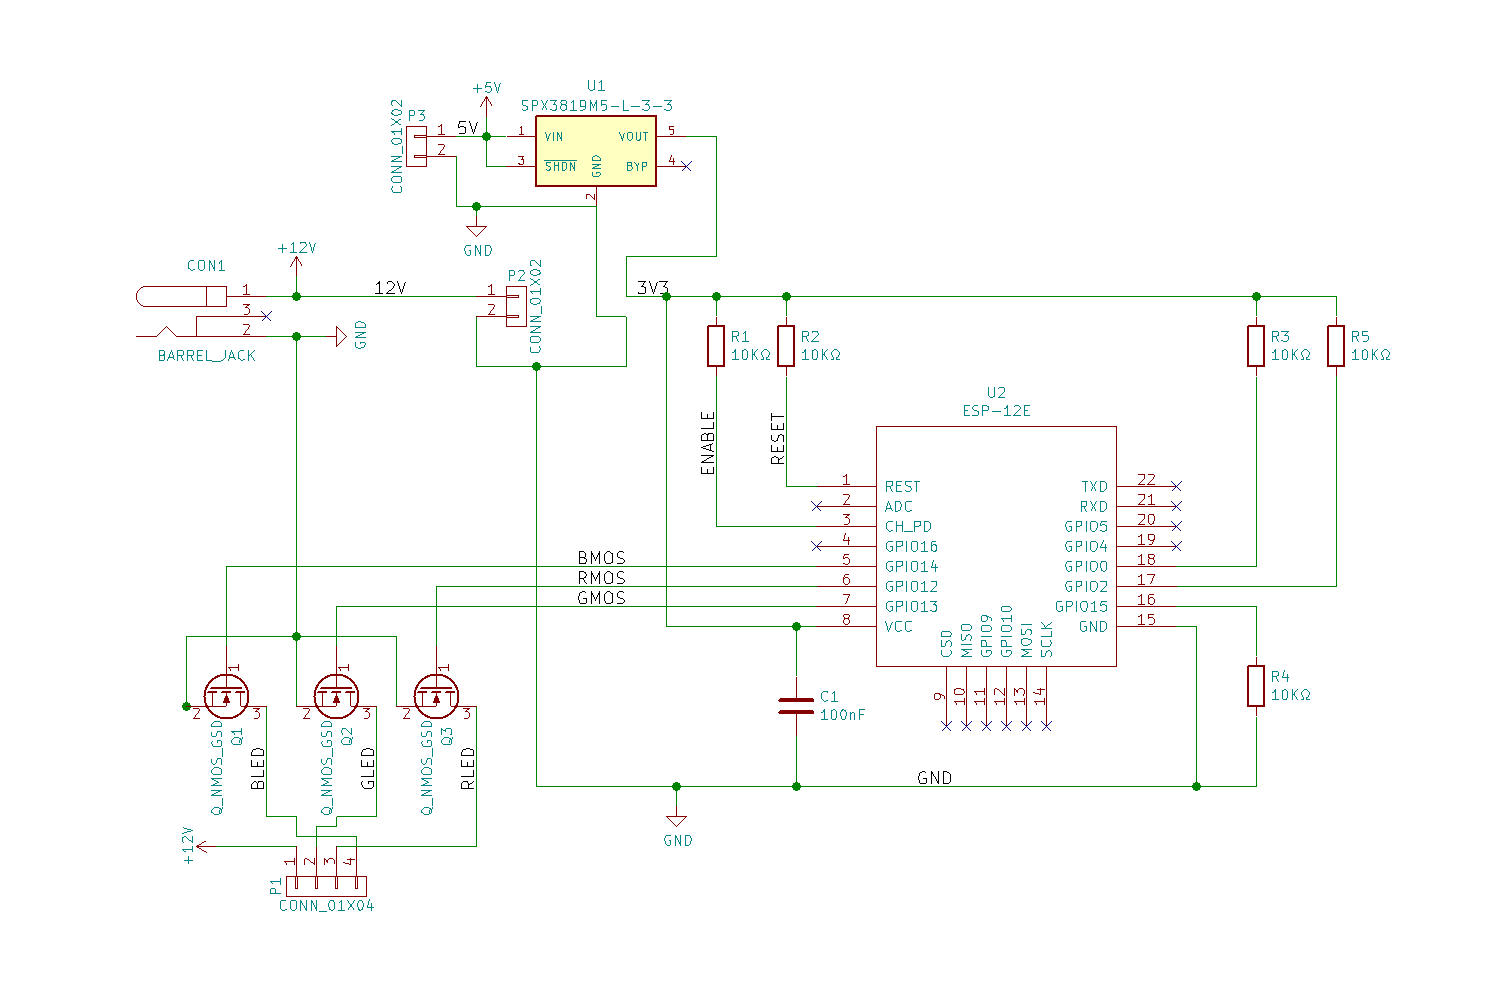 The gamelights controller schematic.
It works exactly like how I imagine the original controller to work, i.e. it pulses the MOSFETs very very quickly to vary the intensity of the light that is produced. Since the ESP8266 has an embedded WiFi adapter, the LED controller can be controlled through WiFi with just a bit of code. The only problem was that the LED strip runs on 12V, whereas the ESP8266 runs on 3.3V, but a step-down converter together with an LDO, which is another kind of voltage regulator that’s more suitable for small voltage drops, solved that very easily.
If you’re wondering why I used two kinds of voltage converters, it’s because the [tiny ESP8266 breakout I designed](https://github.com/skorokithakis/tiny-ESP8266-breakout) already includes the LDO, and I like the fact that I don’t have to be too accurate with the output voltage of the step-down converter, as long as it’s around 4-5V.
The hardware
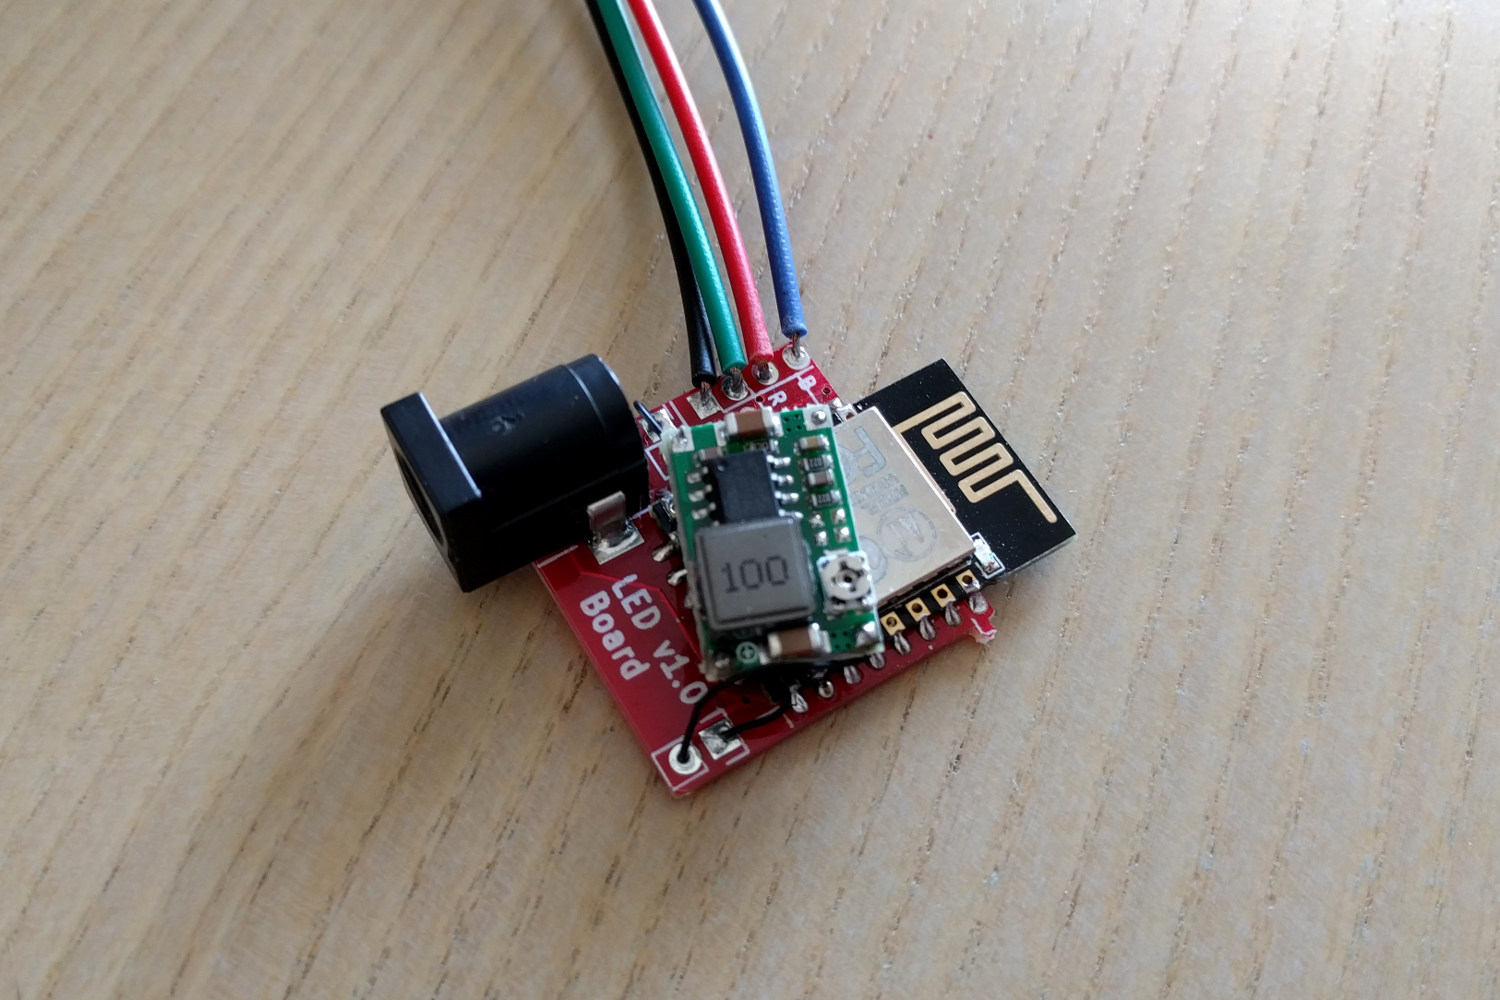
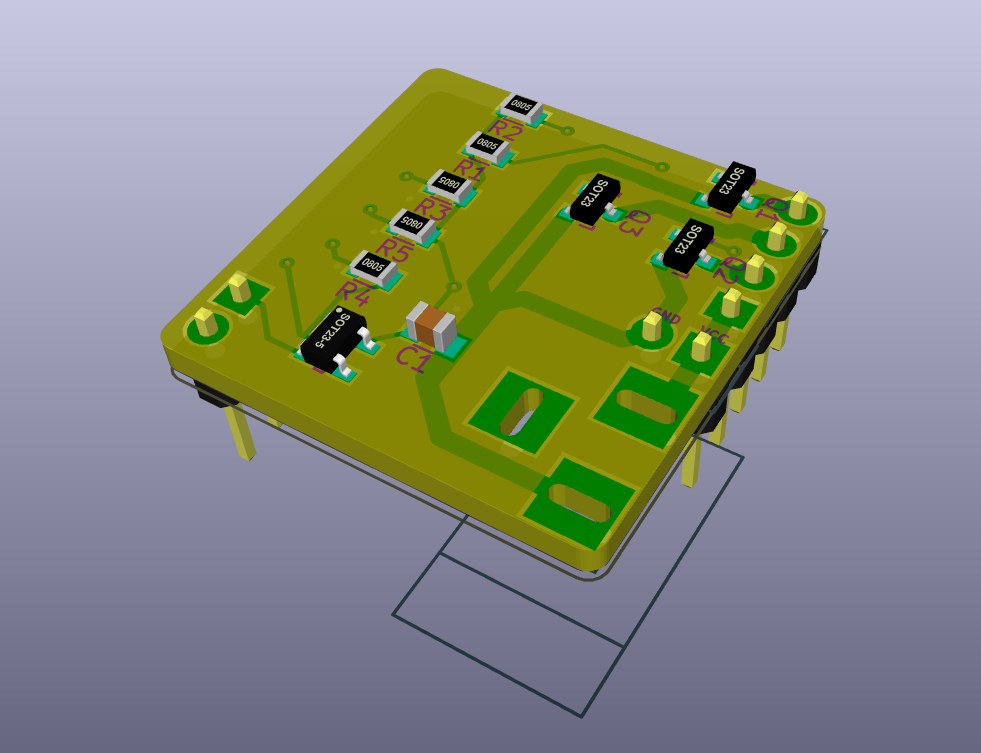 The back of the gamelights controller.
Once I designed the schematic, routing the PCB was easy (and, by far, the most fun part). The only constraint that I had on the PCB was that I wanted to make it as small as possible, perhaps fitting four controllers on a 5cm x 5cm panel. This means that I’d get 40 controllers per fabrication run, which is much more than the two I’d ever need, but you can never have too many wifi-enabled light controllers!
The way the controller works is that you plug it in to a 12V adapter, it steps the 12V down to 5V, which then gets turned into 3.3V by the LDO, and the 12V is passed along to the LED strip, with the three RGB channels coming back to be connected to the ground via the three MOSFETs. To change each LED’s luminosity, the MOSFETs are pulsed open and closed using the PWM functionality of the ESP8266, and voilà, our work is done.
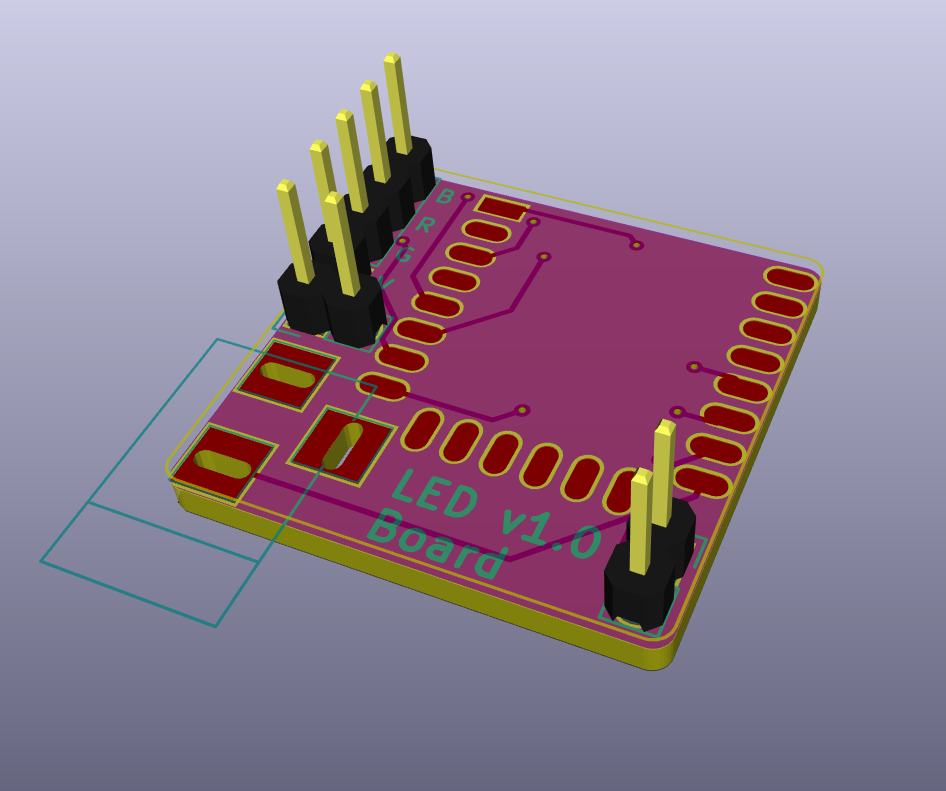 The front of the gamelights controller.
The PCB is pretty simple, with the only wrinkle being the DC-DC converter. Since it’s quite a sizable board (compared to the pretty-small controller) I didn’t want to waste a bunch of space by adding its footprint to the PCB. What I ended up doing was to just have the step-down converter hover above the controller and connect to it with wires, which in practice worked out well enough.
The software
I wrote the software in good old ESP8266 Arduino, although I’ve been suitably impressed with Micropython lately and would like to try that as well.
The code itself isn’t anything too special. It can be controlled either over MQTT, for easy discovery, or over UDP, for more… real-time applications (next section wink wink). It also uses mDNS for discovery, in case you want to use the UDP protocol to talk to it, which makes it easier to discover all the devices around the house. I’m not overly in love with mDNS, as it seems to be working spottily and not the way I would like it to, but it’s passable and it’s very easy to implement on the microcontroller.
You can find the complete source code for the controller, along with KiCAD schematics, footprints and a link to buy the paneled PCB directly in my Gitlab repository:
https://gitlab.com/stavros/gamelights/
It’s called Gamelights, because of all the game stuff.
All the game stuff
One day, I was sitting around, playing Super Hexagon, as one does, when an idea struck me: What if I moved on from what is essentially a meandering, blathering introduction and got to the real point of this post? Forsooth, I will do this anon:
 The actual, ugly, real Gamelights controller.
While playing Super Hexagon, as one, indeed, does, I thought it would be a fantastic idea if I could get the lights in my room to flash with the same color as the color on the screen. Seeing how I already had something I could control the color of, this seemed like a splendid idea. I immediately started to figure out ways to programmatically retrieve the screen color, but every idea I had, from screen captures (too slow) to directly reading the program’s memory (too I-have-no-idea-how-to-do-this-and-I’ve-been-staring-at-Ida-for-hours) failed completely.
Determined to not be defeated, I emailed Terry Cavanagh, the creator of Super Hexagon, who loved the idea and promised to send me a custom build of the game that would emit various bits of information about what’s going on. Unfortunately, he emailed me back a few days later saying that he was having problems implementing this, and that he didn’t know how much time it would take to figure it out, so it wasn’t looking possible.
Even more determined to not be defeated, I Googled around with increasing fervour, finally stumbling upon a post in the small hours of the morning. The post contained some arcane PyGTK voodoo that would capture an area of the screen in mere microseconds, rather than the two seconds that my previous approach took, and the method worked beautifully.
Connecting everything up, I managed to make something that would not only take the color from a specific pixel of the screen (the leftmost pixel of the top left progress bar, if you’re curious), but would also perform a bit more sophisticated analysis to see what was happening in the game, and display some custom colors on death.
Without further ado, this is the glorious, glorious result, whereupon my television is ensconced in the brilliant Gamelights-controlled glow:
It took a surprising amount of LEDs just to do that (the screen is way, way bigger than it looks in the video), but when I said “the lights in my room”, I meant “the lights in the entire room”, so I am either going to buy a ton more LED strips or a bunch of Hue light bulbs and turn my house into an epileptic’s worst nightmare.
The future
Given how awesome this project is, there is only one way forward: Integrate it into more games. Ideally, the games themselves would have some sort of API, or some other way to either communicate what’s happening in the game so I can map colors to it, or a way to output colors directly, but this is wishful thinking. For best results, I need to make this work with every game separately, which is unfortunate, but I can start small.
Currently, my next project is to get the lights to flash along with Rocket League: Orange when orange team scores a goal, blue when blue team does, white when I touch the ball, or red when the opposing team does. Things like that. Imagine how fantastic it would be if, every time you scored a goal, the lights in the room went crazy and quickly flashed orange, or slowly and dejectedly pulsed blue every time you got scored on. That’s right, you can’t imagine it, because it defies imagination, that’s how groundbreaking it is.
Epilogue
If any of you can help in any way, especially with reading game events from Rocket League or any other game, please leave a comment here or tweet to me. I am really excited about this project and want to get more things working with it, and not only limited to games, either.
For example, here are some ideas off the top of my head:
- Slowly increase the lights’ brightness the later it is after sundown.
- Slowly turn the lights red the closer you get to bedtime.
- Turn the lights on progressively five minutes before your alarm time in the morning.
- Turn the office lights redder the slower the production website is.
- Automatically turn the lights on when people yell “SURPRISE!” (for surprise parties or home invasions).
- And much, much more!
I need to wrap this post up, or I can ramble on for ages about this, but do drop me a line if you’re as excited by this as I am and have some good ideas.
Kisses!